Friday, February 4, 2022

 A few years ago I sold the Z3 M and bought a Z4 M.
I bought the Z3 with 90k miles and sold it with more than160k miles. I was amazed at how many people wanted that car!
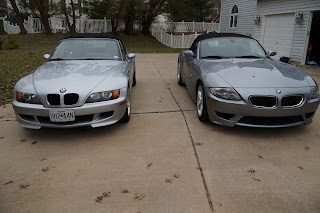

You might think that the Z4 M would be just like the Z3 M only faster. The Z4 has 330 hp compared to the Z3s 240. But, they are very different cars and it's just not that simple.


Z3 design was based on the third generation 3 series (E36) which started development in 1981 and began sales in 1991.
Development began on the Z3 in 1991 with production starting in 1995.

 Z4 development began in 1998. The car went into production in 2003.

In many ways these two cars could be a case study on the changes in the automobile industry from both a technology and style perspective.


For me the bottom line is that both of these cars are great fun to drive. They have distinct personalities that go beyond which one is fastest.


Sunday, September 22, 2013

A Short 1998 M Roadster Tour

On my youtube channel someone asked for a tour video of the Roadster.

Never had a request before and it seemed like a good idea so here it is.
Tour Video
For some reason BlogSpot is not letting me insert the video so a link is all we get.

Tuesday, April 2, 2013

Cool Carbon Brake Pads - 20,000 mile update

They are not the bomb.
Reduced dust - not so much. I think I get as much dust as the stock pads.
Improved braking - I suppose it depends on what you mean by improved. It takes less force on the brake pedal than it did before, so that's a kind of improvement. At the same time the brakes are twitchier or more touchy than before which you may or may not like - I've gotten use to it.

I guess it's all about your expectations.

Wednesday, June 13, 2012

Rotor Replacement Challenge

Usually, replacing the brake pads and rotors an any late 90s BMW 3 or 5 series is pretty easy.
  1. Remove the wheel - 5 bolts
  2. Remove a spring clip
  3. Remove 2 7mm bolts holding the caliper
  4. Remove the 6mm rotor retention screw.
That's about it
Unless the rotor retention screw won't come out.

These screws get stuck more often than anyone likes. Here are some links to some videos on the topic:
How to Remove a Stripped Rotor Locator Bolt
Drilling Out Stripped Brake Rotor Screws
Removing Brake Rotor Screws That Won't Come Out

While replacing the front pads and rotors on the 98 M Roadster I found a rotor retention screw that had been badly mauled. My best guess is that someone had trouble removing the screw and then re-installed it for me to learn from - how nice.

I didn't remove the screw. Here's what I did:
You may wonder why I didn't use an "easy out". My experience with using an easy out has been all bad. I broke an easy out in a drilled out bolt and found myself in worse shape than when I started.

It does bother me that I left that screw in the hub, with a little work I'll get over it.

Tuesday, June 12, 2012

Cool Carbon Brake Pads

Yes, they really are good. There is a dramatic difference in braking between these and the metallic pads I was using before.
The metalic pads had a grinding feel to them, these are smooth. The metalic pads took more foot preasure to engage than the Cool Carbon pads.

the box came with four pads, the instructions and a sticker.
The bedding instructions that came with the pads were crazy - at least they seemed crazy to me.

From the instructions
  • Perform a series of 10 to 12 partial stops from 70 to 20 mph with the first 3 under moderat braking, increasing to 75% to 90% of full braking during the series of stops"
  • Performance should increase somewhat during this process and fall off toward the end of this cycle.
  • Do not come to a complete stop during this cycle, if at all possible, as this may interrupt the material transfer proces to the rotor surface; Note: material transfer process will take longer with new rotors.
There is more but you get the idea.
So what is crazy about this?

  • Finding a road where you can do 10 to 12 accellerate to 70 and then brake down to 20 mph is not easy
  • The instructions go on to recommend "Repeat the above sequence, including the cooling section" so I'm suppose to go through the cycle twice.
  • When you are trying to find a stretch of highway deserted enough to do 10 to 12 runs to 70, brake to 20 and then cool down it's easy to lose count - was that 8 or 9?
I should have checked the website they have new instructions that indicate a long term break in method along with a modified fast break in.

All that aside, I like them.

Thursday, June 7, 2012

How Does an M Roadster Sound?

I think it sounds better at idle than at high RPM
About half way through I experiment with picture in a picture mode on my video editor

Wednesday, May 30, 2012

The Brake Rotor Controversy

Plain, slotted or cross drilled?
In 1998 BMW M models came with plain rotors.
In 2010 the M3 comes with drilled rotors.

Do slots or holes or both actually help?
After much searching I didn't find anything I'd call authoritative on the subject. I chose to go stock solid rotors. The information from brembo at tirerack.com helped make my decision. (the brembo logo uses a lower case "b"). I ordered stock rotors and ceramic pads - rotor and pad replacement video to follow.

The bottom line is that in their advertising brembo appears to emphasize the appearance aspect of the slots or holes rather than the performance aspect. They indicate that drilled rotors should not be used with racing brake pads at all.

Here is the actual verbiage -

brembo Sport Slotted Rotors
On the "Product Description" tab is the following disclaimer:

"Brembo Sport slotted brake rotors are designed to meet the challenges of high performance street driving while adding an authentic, race-ready look.

NOTE: Brembo Sport slotted brake rotors can be used in conjunction with race compound brake pads on the track for drivers’ schools and lapping days.

IMPORTANT REMINDER: Slotted, drilled or dimpled rotors offered as OEM replacements should not be considered appropriate for high-speed track use.

While grooved, drilled and slotted rotors offer an enhanced appearance and add some resistance to the boundary layer of gasses that can build up between the pad and rotor, they are not designed to withstand the extreme temperatures that are produced on the racetrack. If they are used on the track, it is very important that the rotors be carefully inspected and should not be driven on if even minor signs of deterioration are seen. Note, too, that if any products are used on the track they are not warrantable"

brembo Sport Drilled Rotors 
On the "Product Description" tab is a similar but slightly different disclaimer:

"NOTE: Brembo Sport drilled brake rotors are not recommended by The Tire Rack for track use or intended to be used in conjunction with race compound brake pads on the street. For severe duty brake demands see Brembo Sport slotted brake rotors.

 
IMPORTANT REMINDER: Slotted, drilled or dimpled rotors offered as OEM replacements should not be considered appropriate for high-speed track use.

While grooved, drilled and slotted rotors offer an enhanced appearance and add some resistance to the boundary layer of gasses that can build up between the pad and rotor, they are not designed to withstand the extreme temperatures that are produced on the racetrack. If they are used on the track, it is very important that the rotors be carefully inspected and should not be driven on if even minor signs of deterioration are seen. Note, too, that if any products are used on the track they are not warrantable."

brembo Replacement Rotors have no disclaimer. Maybe it's because they don't think people will track plain rotors and so they don't need a warning.

brembo has it's own website. The advertising there indicates benifits in water, to dissipate heat and eliminate brake dust and gases.

Tuesday, May 15, 2012

Convertible Rear Window Cover

BMW didn't start putting glass windows on the rear of a convertible until the E46 in 2000.
So, if you have a BMW convertible 1999 or older you have a plastic rear window.

The plastic scratches during normal use. Convertible tops wear during normal use.
Having a cover over the window when putting the top down helps reduce wear.

You can buy a cover or make one yourself like I did.

Tuesday, April 24, 2012

A Short Lesson On Tire Safety

This 52 second video covers two basics of tire safety
  1. Tread wear
  2. Dry rot
I've had enough experience with worn tires in wet weather to testify as an expert witness on the importance of having enough tread depth to channel water out from under a tire to attain safe traction.

I use to believe that tire dry rot was something invented by the tire sales people. Rubber may crack over time but the tire is held together with steel and fiber strips - right?
My wife experienced the reality of a dry rotted tire flying apart while going down the highway. No one was injured, the vehicle was damaged, and the passenger was freaked out. I take dry rot seriously.

Some articles indicate that dry rot is only a problem if the cords inside the tire are showing. I know this is not true. The tire that flew apart on the highway looked fine except for the tell tale cracked rubber.

Friday, March 16, 2012

Spring is Here

And top down weather has come once again.

I have some plans for this spring.
  • replace warped front rotors and brake pads (maybe paint the calipers)
  • replace floor mats
  • Make a rear window cover using 8 pound pull rare earth magnets
In the meantime it's great just having the top down.

Monday, January 16, 2012

E39 Wipers - BMW 5 Series 1995 - 2003

My 2002 530 needs wipers - bad.
Two ways to fix this problem,
  1. Replace just the blade - I was never happy with the performance of the replacement blade.
  2. Replace the whole wiper - I have been happy with the performance of the new wipers but they were a hassle to get.
Normal wipers won't work on the E39, they are way too cool for that.

If you want to replace the whole wiper auto parts places around here don't stock the part. I ordered from Bavarian Auto in the past (part number 61 61 9 070 579). The wipers cost $57 plus shipping and take a few days to get here.

I found out that the NAPA part number is 3397001539 and my local O'Reilly can get them in just two days for $55

If I had shopped around a little harder I might have found them in stock somewhere close.

Sunday, January 8, 2012

Hitting 100,000k

The M Roadster rolled over 100k miles a few weeks ago. Once upon a time that was an amazingly huge number of miles for a car. I see it as mid-life for most cars made in the last 20 years, especially this one.

Last week I was driving to work, I was on the highway and felt a vibration in the front end. It felt like I had lost a wheel weight and one of the wheels was out of balance. It wasn't terribly bad so I kept driving.
Turned out the vibration was a sticky brake caliper draggin on the rotor.
Normally this is the sort of thing I'd fix but I was no where near home and I felt lazy so I let the shop fix it. Add $288 for parts and labor to my maintenance tally.
I suspect front brake rotors are in my near future. The mechanic said it was obvious that it got pretty hot.

Thursday, December 15, 2011

How to Buy a Z3 or M Roadster

It’s important to have a strategy when buying a car. There are lots of good strategies, here is a simple one.
Look the car over carefully in the day light and decide if you want it or not.
If you don’t want it walk away.
If you do want it make a list of the things you don’t like as a discussion point for negotiating price.
Z3 and M Roadster things to look for:
  • Sagging glove box – with the glove box closed push up on it from the bottom, it should be firm and not saggy. The glove boxes on these cars are heavy and tend to sag.
  • Seat play – the back and forth mechanism on the power seat develops about a quarter inch of back and forth play. Put the seat about in the middle of it’s back and forth adjustment making sure that the seat back is not resting on the inside of the car. With your legs push back and forth and see if the seat will slide back and forth. My car has this problem and it’s very common with Z3s. I’ve had mechanics estimate about two hours work per seat to fix it ($200 per seat)
  • Broken seat belt guide – there is a seatbelt guide on both seats, frequently one or both of them are broken. They are very hard to fix so most people just live with it.
  • Convertible top wear – a cloth convertible top is a wear item, like tires or brakes. You should expect to have to replace it eventually. A new top will run $3000 to $5000 ( I know that’s a wide range, I’ve never actually replaced the top so I gave a safe range).
  • M Roadsters do not have a spare tire. They did come with a can of fix a flat and a 12 volt compressor in the trunk on the right hand side. Frequently the repair kit is missing.
  • Z3 check the spare tire, make sure all the tools are there.
  • Dash lights – the light bulbs on the three climate control dials are frequently burned out. Check the lights in the other buttons – AC etc. These lights are not too horrible to replace – I’d guess and hour or so for a mechanic. I have replaced some of the ones on my car that are burned out but not others.
  • Make sure all the speakers work and sound good – sometimes people play the system too loud and damage speakers.
  • The usual car stuff stuff – tire wear, oil puddle on the ground, strange noises, driving straight etc.
If, after making the list you still want the car assign a dollar amount to each item and subtract it from the asking price, then make an offer. When the negotiation starts you can say “Well, the seats slide like a roller coaster and the top is worn so I can’t give you the asking price...”
After you have made your deal and brought your vehicle home here is a link to a site that has links for fixing all of these issues if you feel so inclined.

Sunday, December 4, 2011

There's a Hole in My Stereo

Not an actual hole but it sounded like there was a hole.
The two speakers in the driver's side door were dead when I bought the car. It's a nine speaker system so there was lots of sound in the car but with the door speakers out it sounded like there was a hole.

The car came with an after market head unit and an amp in the trunk. Stock wiring was used. The stock amp was removed.

I did a lot of research and read about the pains others have had with stereo installation in a Z3. I'm up for removing door panels, replacing head units and the like, but tearing into a system with the stock amp cut out and wiring hooked up to an aftermarket amp worried me. Were the door speakers not working because they were broken or because the wiring was messed up? I decided I'd talk to some experts. After asking around a place was recommended. I made an appointment for 10 AM.

The shop had several BMWs, a variety of M3s from a 98 to a 2004 so it was clear they had experience with BMW sound systems. John believed that the door speakers were broken. He recommended replacing all six of the speakers in the front of the car with four speakers - parts were $250. He also recommended running RCA connectors from the head unit to the amp. The whole job was $410 and he would get it done that day in two to three hours. I opted to wait at the shop since I had not arrainged for transportation - I'm pretty good at killing time.

By 6 PM that night John was still not finished. My wife swung by after work and took me home. They promised it would be ready for pickup at 8 AM the next day. It was done in the morning and sounds great.

John did some nice work adjusting the amp and balancing out the sound.

Lessons Learned
  • Don't wait inthe shop on spur of the moment repairs unless you know for sure how long they will take. Schedule a date, arrange for transportation and leave the car.
  • Experience with your specific model of car is important. Even though John had worked on many BMWs he had never tackled a Z3. Getting Monster cables to the trunk turned out to be the barrier to a three hour install.

Monday, November 21, 2011

98 Ford Ranger 3L V-6 Idler Pulley and Tension Pulley Replacement

No, it's not Roadster related.
I've been poking around the wiring for the stereo. Three or four speakers in the car don't work.
Found four wires that have been cut and are just hanging around which may or may not be part of the problem.
I'm just not looking forward to fixing the things that remain on my list.
I'm having a great time driving the car!

Anyway, here's the post.

Friday, September 23, 2011

Strut Compressor

Last Saturday (the 17th) I used the strut compressor (previous post) for the first time.
It took a little messing with to get it set correctly but it was fantastic.

Working on a Nissan Maxima rear struts the compressor made the job easier, faster, and safer.

They say that a poor workman blames his tools. Maybe that's true but it's much easier to be a good workman with good tools.

Yes, I should have done a video.

Tuesday, August 30, 2011

Does Color Really Matter?

The short answer is yes.
My M Roadster came with an after market head unit that is a brushed aluminum color. It sort of matched the chrome rings on the gauges (not really).

Here's the one that came with the car.

Here is the one I swapped into the car.

Originally BMW equipped this car with a black head unit, pretty sure it was AM / FM / Cassette. I've always thought it was very plain and did nothing to help the center console look good. After living with the brushed aluminum look for a few months I like black.
Maybe BMW got it right after all.

A little about the swapped in unit. It came from my '97 328 convertible. I replaced the original BMW unit with this one a few years ago. It took a lot of searching to find one like this, I don't know if there are any made like it anymore. What makes this unit so special to me is that it has a USB port and a 1/8 inch AUX input on the front.

I wanted the ability to plug anything into the head unit and have it play out of the car speakers without having wires run into the rear of the unit.

The USB port will take any USB hard drive (external hard drive, thumb drive, memory card adapter etc) and it will also take an iPod connection. I have a memory card adapter that is very small - it sticks out less than 1/4 inch - and it holds 8 gig of music. I leave it in all the time. I never need a CD player, but if I do there is one behind the face.

Saturday, August 27, 2011

Car Show

Spent the morning at a local car show.
Almost 300 cars showed up. The Roadster was in the Foreign category along with about 15 other cars. I thought the coolest car in my category was the Honda NSX but I didn't vote for it, I almost voted for it.

Here's my car at the show.


Awards were by popular vote. Lots of my friends were at the car show and I asked them to vote for me. I thought I had a chance at least at third place. I should have seen it coming but Herbie beat me for first, second, and third. One of the Volkswagen Beetles was even done up with a "53" and painted like Herbie.
The only thing I got out of that car show was a really clean car.
I guess it's impossible to beat a car with that much publicity, he made 6 movies!

On another topic, I realized something at this show.
Look at these pictures of early 60s Corvette dashboards:
 '64 hardtop

'64 convertible
Now look at the M Roadster dashboard
There are strong similarities.
As I wandered around the show looking for other cars that bore some resemblance to this dashboard layout there were lots of cars with a "dual cockpit" type layout but nothing as clearly similar as the early 60s Corvettes.

I'm not saying the BMW designers had these Corvettes in mind when designing the Z3 interior (maybe they did, I don't know). At the end of the day there are only so many ways to lay out a dashboard. It's inevitable that some cars will look like others even if the designers were all kept in isolation.

Saturday, July 30, 2011

Pressing In A Control Arm Bushing

Pressing in a new bushing for the control arm is part of a previous post - replacing control arms.
This is not something you can do with normal home tools, but the tool that does it can be found for around $100.

Wednesday, July 27, 2011

Hydraulic Strut Compressor

A great shop needs great tools.
After replacing the struts on my 328 and helping others with their struts I've been on the prowl for a shop style strut compressor. Yesterday a friend of mine spotted this one on craigslist for $75
It's a grimy Omega 9000 4 ton hydraulic strut compressor. It looked like all the parts were there so we drug it out of the junk filled shed and hauled all 105 pounds of it home.
The previous owner bolted the pump part of the compressor to a bar wielded on the base. It's held on by the one bolt you see here. Attaching the pump seems like a good mod, not sure the bolt is enough.

I cleaned it up and lubricated the bolts and hinges and wheels. Here's how it looks now.

Close up
At least I don't have to worry about getting greasy just by bumping into it.
Looking forward to using it.